
Use our Telemetry Ingestion integration to publish data to Consibio Cloud from 3rd-party solutions, and use it in your applications. Data published thought the integration, can also be used to trigger alarms, and be included in reports, just like how you'd normally use data from your devices.
More details on how to interact as your new integration, with our API, can be found in our Swagger Documentation.
- Go to Swagger Documentation
Creating your first Telemetry Ingestion integration
Before starting this guide, please make sure that you have created a Consibio Cloud account, and at least one project.
After opening your project, navigate to the "Integrations" tab in the primary navigation menu, located at the top of your screen.
If you don't see the "Integrations" option at the top of your screen, please contact our Support Team by creating a new ticket, and request us to enable the feature in your project. Speed up the proces, by mention both your user and the project, in the submitted ticket.
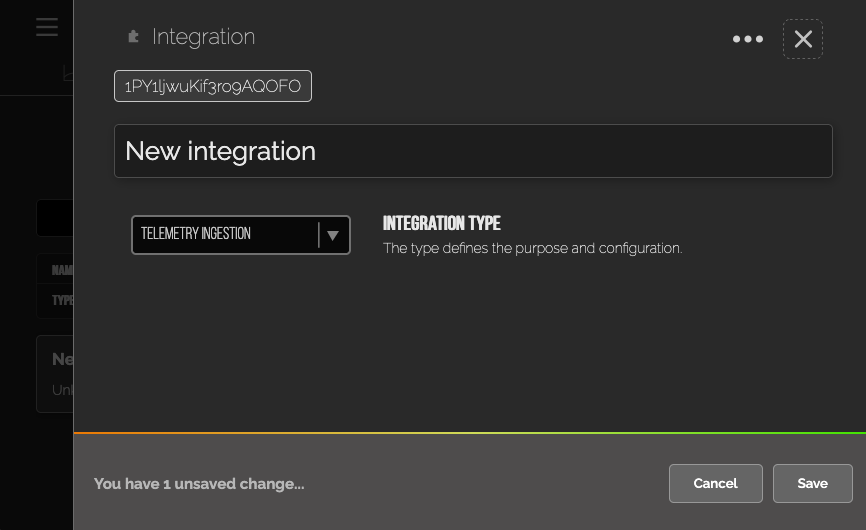
Once you're at the "Integration" page, please do the following:
- Press "Add new integration"
- Give your integration a meaningful name
- Select "Telemetry Ingestion" as the Integration Type
- Press Save
- Reload the page and confirm that the integration are now listed in the table
 Setup your Telemetry Ingestion integration
After you've created the integration and reloaded the page, please click on the new integration, to open up the configuration panel.
This integration expects a API-key to be configured, and one or more elements whitelisted as the destination element for the integration. You cannot publish data to a element, which is not whitelisted in Consibio Cloud.
Let's now start configuring our integration.
1. Note down your integration ID
At the top of the configuration panel, you'll find your new integration ID. We'll use the ID later, in order to use the new integration, so please memorize where it's located in the panel.
2. Add your API Key
The integration needs it's own secret API key. We always recommend you to use a unique API key for each integration. It's always good practice to use a long string, generated with both letters, numbers and special characters. Never re-use your Consibio Cloud password.
If you have set a API key before, but are not able to recover it, it's always possible to change the API key. Store and handle your API key as if it was your password to your Consibio Cloud account.
3. Whitelist elements
A given integration can publish data to one or more elements in Consibio Cloud, but they need to be whitelisted and created beforehand.
Create and/or select the elements you want to publish data to. You will run into errors, if you publish data to other elements other than the whitelisted ones.
Adding aliases and swapping elements
Once you've selected one or more elements, you're ready to start using the intergration. But before doing so, please take a look at the "Aliases" section in the panel.
Our Telemetry Ingestion service expects you to always provide the Element ID, or the alias of a given element, in other to publish new data.
In the below example, we've set the alias "humi_1" for the Humidity element, allowing us to use "humi_1" instead of the element ID "r17thRHWABfIebUl0743", every time we publish data to Consibio Cloud.
Swapping a given element will simply remove the old element from the whitelist, and populate the new element, to the whitelist.
Always remember to save your changes.
Logging in as an integration in Consibio Cloud API v2
We offer an API, where you are able to query data from a given Consibio Cloud project. Normally you'd use your normal Consibio Cloud Account, in order to obtained a access token for our API. However, integrations comes with it's own limited access scope and authentication method.
A given integration can only login and query integration-related data - and most importantly - publish data to Consibio Cloud.
Please open our Swagger Documentation, and take a look at the following endpoints:
| Method | Endpoint | Fair use |
| POST | /oauth/integration | |
| GET | /projects/{project_id}/integrations/{integration_id}/telemetry | No more than 2 requests per minute (one every 30s) |
| POST | /projects/{project_id}/integrations/{integration_id}/telemetry | No more than 6 request per minute (one every 10s) |
To obtain a access token, you login by sending a POST request to our "/oauth/integration" endpoint.
Please ensure that you have set a "Content-Type = application/json" header and provide the following keys in a JSON object:
| Key | Description |
| api_key | The integration API key |
| project_id | The project ID where the integration is created |
| integration_id | The ID of the integration itself |
In return, you'll get a "access_token" including a "expires_at" and other useful information.
Making requests to access-restricted endpoints
To access a restricted endpoint, you simply add your access_token in the Authorization request header, as described here.
Do note that our integration-specific endpoints are restricted to Integration-sessions only. Therefore, requests to these endpoints will be denied with your normal Consibio Cloud API user-based session, even if you're normally able to write to that specific Consibio Cloud Project.
Get the whitelisted elements at Consibio Cloud API v2
You are able to query every whitelisted element ID and their related aliases, by sending a GET request to "/projects/{project_id}/integrations/{integration_id}/telemetry".
This endpoint requires a valid integration session token.
Publish telemetry as a integration at Consibio Cloud API v2
Publishing data to Consibio Cloud can be done with a POST request to "/projects/{project_id}/integrations/{integration_id}/telemetry".
Please note that you need to follow a few requirements:
- All elements in the payload needs to be whitelisted
- All timestamps needs to be Unix Timestamp in seconds
- We allow float, integer and string values. Float and integer-values will also be stored as historical data.
For the most recent example on how to format the JSON object, please visit the Swagger Documentation.
We expect an key-value object containing each element-ID or alias as the key. We expect the values of each key to be an Array of Arrays. Each of the nested arrays contain two entries: a Unix Timestamp in seconds and the value itself:
{
  "element_id_2": [
    [
      1679003040,
      23.1
    ],
    [
      1679003100,
      25.2
    ]
  ],
  "custom_alias_name": [
    [
      1679003040,
      820
    ],
    [
      1679003100,
      819.7
    ]
  ]
}
Note that all requests with a JSON body, requires the "Content-Type = application/json" header to be set.